Showing posts with label Simon Says Stamp. Show all posts

Tuesday, May 10, 2016

Felt Phone Cover

Hello everyone,
 Most of you know I don't only like crafting with paper, but also with fabric & beads. So today I would like to share a non-paper project with you: A new cover for my smart phone!

Not sure how you girls do it, but my phone tends to get scratched from the house keys in my purse and I don't like that…. So I needed something fluffy to protect my –seriously too expensive– mobile devise!


It's really simple, all you need is a small piece of felt & matching thread!

You don't even need a sewing machine because it's only 2 lines which need to be sewn and you could do it by hand. But I'm lazy and it's much faster with the machine…

And if you like the design a little more elaborate then see what you find in your fabric or ribbon stash! In my case I found some blue lace which I have once bought on a trip to Peru.


This is how you do it:
  1. Wrap a piece of felt length wise around your phone for measurements.
  2. Keep a little gap on all sides (approx. 3-4mm) as extra room for your phone to easily slide in and out + 1cm of hem line & then cut the piece out
  3. Embellish the fabric as intended (e.g. I sewed on that lacy piece to 1 side on the fabric)
  4. Fold the felt right sides & lengthwise together & sew together (leaving the 3-4mm on all sides for the phone to slide in and out easily)
  5. Cut the extra fabric along the stitching lines, leaving only 2-3mm (you can finish it off with your machine but my felt actually doesn't fray much so I never do it)
  6. Turn the felt inside out to reveal your beautiful new phone bag :-)

 Give it a try, it's done in a jiffy!!

Yours,
Steph


P.S.: This is my new project for the Home Decor Challenge by Simon Says Stamp's Monday Challenge.

Simon Says Stamp Monday Challenge Blog

Monday, May 2, 2016

Interactive Card: the 'wiggle' effect ON YOUTUBE (Altenew Challenge #6)


Hello dear crafters!
Today's entry clearly is a SPECIAL EDITION:
I have created my VERY FIRST Youtube video!!


And yes, I was struggling massively…! haha :-) 

So let me explain where this all is coming from and what actually made me do this:


Many of you may know that Altenew started having Video Challenges since a few months now and while I always admired those crafters actually doing a video of their creations in their spare time, I always thought this is something not for me (lack of time, technical skills, etc.). But some 2 weeks ago I saw the weather forecast predicting an Arctic cold over Europe and so my gardening plans all died out. After all my business travelling I planned on having a calm weekend, and so I thought: why not make a new card and film myself while doing so!? And let's not worry about the editing… I might never do it and that's absolutely fine! 

Well, what can I say, I'm competitive, and especially when it's against myself, and so I couldn't have this SUPER-LONG & really boring video on my phone, I HAD TO DO SOMETHING WITH IT!Those of you who have tried to create a video , may know what came next…. A big struggle of OMG HOW do I edit a video? HOW can I cut it down? Fast forward? Apps/Softwares? Voice over? – No! pheewww this is all really overwhelming!

Well, it's a hobby, right? So it should be fun and exciting! So I started slowly, bit by bit… And frankly, that's exactly what it was – fun and exciting to learn something new! I enjoyed looking for a free editing app, learning how to use it, playing with all sorts of settings (on my phone as well as my crafting table), etc. No time pressure! 

I know the outcome is not great, but for a first try, I am actually quite proud of myself :-)

Yes, next time I will try to  craft on a sunny day, have more training with the editing, might try annoying you with my accent, and so on and so forth… but give me some time, I actually enjoy the (slow) process! 

So enough about the video struggles, let's talk about my creation:

Altenew is known for their amazing & classy looking style, but I was certain that one can do more than elegant cards with their amazing stamps; so I was going for a modern & interactive look!

This is what came out: A ROCKING SYDNEY OPERA card!! Yes, you can wiggle the Opera House with your fingers, and the "mechanism" is all hand-made (no fancy gadgets involved other than a simple gum ring you will find in your kitchen)!!
Check out the video if you would like to see how I do it (yes, a video comes in very handy when making out-of-the-ordinary-cards, to explain in pictures what I have actually been doing to create the 'wiggle' effect). 

Hope you enjoy this raw little diamond of mine & hope to see you soon!

Ah, and a BIG GIGANTIC THANK YOU TO ALTENEW FOR GETTING ME OUT OF MY COMFORT ZONE & MAKING ME DISCOVER THIS NEW WORLD OF TECHNOLOGY – AWESOME! I would have never done it without your challenge blog but I am so glad I did! 

Until next time! With a video?? Who knows :-) 

Yours,
Steph
 
PS: I'm also participating with this card in the latest Simon Says Stamp Monday Challenge 'show your metal' (what's better than a ton of Liquid Platinum 😉), as well as the Simon Says Stamp Wednesday Challenge 'anything goes'.
And this card also fits perfectly to Altenew's latest Inspirational Challenge which is about: AUSTRALIA!
Simon Says Stamp Monday Challenge BlogSimon Says Stamp Wednesday Challenge BlogAltenew_Inspiration Challenge_May


Monday, August 3, 2015

RELAX!

Hello dear crafters!

It really seems as if I had disappeared lately! The last few weeks were so soaked up with business & leisure travel, but now I'm back & very keen on getting my fingers inky again!!


To start my mojo again, I just had to create a relaxing summer themed card – look what came out:
And here is a close-up of that cute little kitty snoozing in the hammock:

This little kitty is a single wood mounted stamp which I have in my stash since quite a while & I absolutely adore it! Not sure who's the designer though, but it's so super cute I find.

If you look carefully at Lawnfawn's "Life Is Good" hammock, then you'll see that it is actually a little smaller than here on my card. TRICK: Just stamp half of the hammock to one side, stamp the other half with a little distance apart (as big as you want the hammock to be, although I think stretching it for an inch or more won't look very good anymore), take a fine black marker & connect the dots. Voila, here you have a larger hammock for larger critters ;-)

Watercolor is still very much in fashion, and I love it as much as most of you, so I've created a very simple background by simply drawing 3 soft colored lines to mimic the sky, the ocean & the beach.

Lot's and lot's of foam squares make this card really POP!

supplies used:
- Lawnfawn "Life Is Good"

- Paper Smooches "Get Outta Town"

- Distress Inks: Wind Honey, Peacock Feathers, Tumbled Glass, Spiced Marmelade (hammock)

- Watercolor Pencils (Caran D'Ache) for the kitty, & the palm trees


Thanks for stopping by & I hope to see you again soon!

Yours,
Steph


P.S.: I am participating in the following challenges with this card:


>> SSS Monday Challenge *Make a Plan* (the plan is definitely self-addressed to take more time off & to RELAX - just like this kitty!)

>> Stempelküche Challenge *Sommerzeit*

>> Paper Smooches *Anything Goes*

>> I just stumbled over a (new to me) adorable challenge blog where I thought my card would fit perfectly4 Crafty Chicks with their current *Anything Goes* Challenge


Grab our Badge!Simon Says Stamp Wednesday Challenge BlogSimon Says Stamp Monday Challenge Blog

Wednesday, May 13, 2015

I love stencils!

Welcome back,

Today I would like to share another favorite technique of mine:  
working with stencils!

I loved stencils ever since I was a child, because they give you the precise outlines without being a particularly gifted painter - yet it always looks perfectly hand-drawn or hand made.
What an awesome product!! = )

What I particularly like when using stencils for backgrounds is the fact that you can really go wild and essentially create your own patterned paper - only custom made!

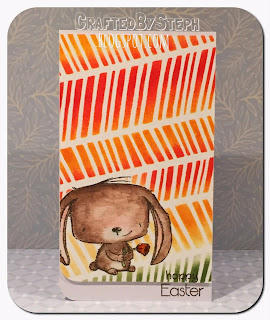
This is exactly what I've been doing for this card here: The intention was to create a very powerful background, yet combined with a little bit of green to "ground" my little fury friend without any extra fuzz. 
I'm a great fan of Simon Says' stencils and that's why I would like to dedicate this card to the latest "Simon Exclusives Challenge". 

Material's used:
- SSS stencil
- Stacey Yacula stamps (Purple Onion Designs)
- Ranger Distress Inks (barn door, wild honey, shabby shutters) 
- Watercolor pencils (for the bunny, check out how I drew the fur, I'm so proud of the result)
- Wink of stellar (inside of the ears)
- Glossy accents (on the flower)

Happy crafting & see you again soon!
Yours, Steph

Simon Says Stamp Monday Challenge Blog

Wednesday, April 8, 2015

Doppelter Geburtstag (buchstäblich) - double birthday (literally)!

Hallo liebe Papier-Freunde,

Ich hatte letztens eine neue Herausforderung: Eine Karte für neugeborene Zwillinge!
Und da Zwillinge bekanntlich im Doppelpack kommen, hab ich gedacht ich probiere das Spiegel-Stempeln aus (damit sich die 2 Häschen anschauen können). Nicht ganz einfach muss ich sagen... aber nach etwa 5 Probedurchläufen ists es mir endgültig *schön* gelungen :o)

Hier die Karte auf die ich besonders wegen dem 3D-Hintergrund (durchsichtige Embossing-Paste gemischt mit Distress Inks) stolz bin: 


verwendete Materialien:
- SSS Schablone
- Durchsichtige Embossing-Paste
- Distress inks (wild honey, spiced marmelade)
- Stempel von Stacey Yacula (Purple Onion)
- Klebeperlen
- "Baker's twine" grau
- Wassermalstifte

Mit dieser Karte mache ich bei den folgenden Challenges mit:
- SSS Wednesday Challenge - Birthday (buchstäblich Geburtstag)
- SSS Monday Challenge - *A* is for... (*adorable bunnies*)
- Virginia's View Challenge - Layers & Dimensions (viel 3-D hier mit der Paste & den Häschen auf dicken "foam pads")
- Friday Mashup Challenge - 203 (Häschen & Farb-Kombi)
- Always Playing with Paper - Challenge #29 (Sketch)

Bis bald,
Eure Steph

* * * * *

Hello dear paper-friends,

Lately I faced a new challenge: Making a card for newborn Twins! And because twins always come in a pack of 2, I thought I'll try to do some 'mirror-stamping' (to make these cute bunnies face each other). Not quite so easy I must admit... but I managed to get a *proper* result after 5 attempts :o)

I'm particularly proud of this card because of the 3-D background (translucent embossing paste mixed with distress inks).

Supplies used:
- SSS Stencil
- Translucent Embossing-Paste
- Distress inks (wild honey, spiced marmelade)
- Stamp from Stacey Yacula (Purple Onion)
- Sticky pearls
- "Baker's twine" grey
- Watercolor pencils

With this card I participate in the following challenges:
- SSS Wednesday Challenge - Birthday (literally birthday)
- SSS Monday Challenge - *A* is for... (*adorable bunnies*) 
- Virginia's View Challenge - Layers & Dimensions (lot's of 3-D here with the embossing paste & the bunnies on thick foam pads)
- Friday Mashup Challenge - 203 (bunnies & color combo)
- Always Playing with Paper - Challenge #29 (Sketch)  

Until next time,
Yours Steph
Simon Says Stamp Monday Challenge BlogSimon Says Stamp Wednesday Challenge BlogApril/May Challenge: Layers and Dimensions


Tuesday, April 7, 2015

Ein Geburtstagsfrosch - a birthday frog?

Hallo zusammen,

Ich hoffe ihr hattet erholsame Ostertage & ein paar kreative Minuten übrig übers Wochenende!
Heute zeige ich euch eine meiner neuen Geburstags-Kreationen (in meinem Freundes- und Verwandtenkreis gibt es im Frühling sehr viel zu feiern). 
Dieses Mal: ein Geburtstagsfrosch!
Ich muss gestehen, sog. '1-layered cards' (also wo man nicht mal auf einem separaten Blatt Papier stempelt, sondern direct auf der Basis), sind immer noch extrem schwierig für mich, aber ich werde immer besser! Ja, ja, Übung macht bekanntlich den Meister. 

Also nicht vergessen: Nicht zu viel Wasser verwenden (da kein Wasserfarbenpapier), und alles immer schön trocknen lassen bevor man weiterarbeitet!


Verwendete Materialien:
- Weisses Papier (als Basis)
- Frosch von Stacey Yacula
- Glossy Accents (für die Augen)
- Lawn Fawn: Critters Down Under ('hoppy birthday')

Zu guter Letzt muss ich noch eins loswerden: Ich finde Stacey Yacula's Stempel (Purple Onion Designs) einfach so unfassbar süss!! Geht's euch nicht auch so? :o)

Bis zum nächten Mal,
Eure Steph

P.S.: Mit dieser Karte mache ich auch bei der folgenden Challenge mit: Simon Say Stamp Wednesday Challenge - Birthdays & der Simon Says Stamp Monday Challenge - A (für den April Geburtstag) & der Addicted to CAS Challenge - Cute

* * * * *


Hello everyone,

Hope you had some relaxing Easter holidays and a few creative minutes to spare over the weekend! Today I show you one of my latest Birthday creations (there is so much to celebrate in Spring with my family and friends).
This time: A birthday frog!

I must admit, I'm still struggling with those so called '1-layered cards' (i.e. where you don't even stamp on a separate panel of card stock but on on the base layer itself), but I'll get better by time. Ya, ya practice makes a master!

So never forget: Don't use too much water (because I didn't use water color paper), and always let every section dry completely before working on!

Supplies used:
- White card stocl (as a base)
- Frog from Stacey Yacula
- Glossy Accents (for the eyes)
- Lawn Fawn: Critters Down Under ('hoppy birthday')

Finally I need to say one more thing: I absolutely adore the Stacey Yacula stamps (Purple Onion)! Aren't they so super cute??

Until next time!
Yours, Steph

P.S.: I also participate in the Simon Say Stamp Wednesday Challenge - Birthdays
& der Simon Says Stamp Monday Challenge - A (this is an April Birthday card) & the Addicted to CAS Challenge - Cute
Simon Says Stamp Monday Challenge Blog


Wednesday, April 1, 2015

Stempelküche Challenge #16 - DIY Hintergrund

Hallo zusammen,

Heute ist der grosse Tag:
Meine erste Kreation geht LIVE auf dem Stempelküche Challenge Blog!!


Ich freue mich total und hier habe ich ein paar mehr Details zu meinem Projekt:
  • Eines meiner absolutel Lieblings-Stempel-Sets ist nach wie vor "Surf's Up" von Avery Elle, und alle 4 Surfboards wurden hier verwendet um den "Stapel" zu kreieren.
  • Da ich keine hochwertigen farbigen Stempelkissen habe, sondern nur einen Pack "Kinderstempel" (die nie trocknen und selbst nach 3 Tagen immer noch verwischen), habe ich mich entschieden eine Ladung durchsichtiges Embossingpulver darüber zu leeren um das ganze zu fixieren. Den kleinen Schimmer könnt ihr im 2. Bild unten besser sehen. Ich finde den Effekt super und bin sehr zufrieden mit dem Endergebnis!
  • Alles zusammen keine Hexerei, man muss nur ein bisschen geduldig sein beim Stempeln, sodass nich alles verwischt bzw. die Surfboards nicht zu sehr überlappen.
  •  Love it!! = )

Bis zum nächsten Mal!!
Eure Steph

* * * * *

* * * * *

Hello there,


Today is the big day:
My first creation goes LIVE on the Stempelküche Challenge Blog!!!

I am extremely excited & here I have a few more details on my crafty project:
  • One of my most favorite stamp sets is still "Surf's Up" from Avery Alle, and I've used all 4 surfboards to create this 'pile'.
  • Because I don't have any good quality stamp pads (I only have a stack of cheap kid's stamp pads which never dry and smudge even after 3 days), I decided to pour some clear embossing powder over the whole pile of surfboards to basically 'lock the colors in'. You can see the subtle shimmer in the second picture. I love the effect and I'm very happy with the result.
  • All in all this is quite a simple card to make, you only need to be a little extra patient stamping those boards to make sure they don't smudge or overlap too much. 
  • Love it!! = )

See you soon!
Yours, Steph

P.S.: Mit dieser Karte mache ich auch bei der Simon Says Stamp Wednesday Challenge sowie auch The Challenge - "one year Anniversary" mit (beide Themen sind "anything goes").
P.S.: With this card I also participate in the Simon Says Stamp Wednesday Challenge as well as The Challenge - "one year Anniversary" (both topics are "anything goes").
Simon Says Stamp Wednesday Challenge Blog

Wednesday, February 11, 2015

Love penguins!!

Hello again,

I would like to share my new love with you: adorable 'Walter' from Stacey Yacula's (Purple Onion) latest collection! I have only recently discovered Stacey's incredible talent on Therese's blog (LostInPaper) and I immediately fell in love with these cute stamps.
I am now the proud owner of a few of these lovely critters & absolutely addicted to making cards with them!!

Here my first attempt for a love-themed card:

A bit of masking technique, some heat embossing & distress markers... that's it!

See you soon & thanks for your visit!
Take care,
Steph

Supplies used:
- Walter the pinguin from Stacey Yacula (Purple Onion)
- Distress Inks (tumbled glass, peacock feathers, pumice stone, faded jeans)
- White & Seafoam embossing powder
- Watercolor pencils
- Black & white card stock

I participate in the following challenges with this card:
Cas-ual Friday Challenge: Love Watercolor


SSS Wednesday Challenge: bright & beautiful
Simon Says Stamp Wednesday Challenge Blog


Stempelküche Challenge #12: von Herzen


Inspiration Journal: Love is in the air

RIC Challenge #77 - Jenny Packham


Tuesday, February 10, 2015

Longing for summer...

Hi there & thanks for stopping by again!

I must admit the short winter days in Europe & the low temperatures are slowly getting to me, so I decided to bring the summer into my crafting room:

This was a special project not only to lift my own mood, but also as a birthday gift for my friend who loves to travel the world (particularly the sunny & relaxing places).

What's special about this card is the see-through shaker element on the front panel, where all adhesive is nicely hidden behind hand-cut frames & palm trees (as you may know I still don't have a die cutting machine so I make everything by hand, and I actually like the outcome a lot).
Adhering the thread for the hammocks was a little fiddly I admit, but the end result shows that it's worth the effort!

And by the way: the white sequins in the shaker part should imitate some white wash of the waves... in case you were wondering =D

I for my part want to go to my favorite Australian beach now... oh if it wasn't so far away!

Thanks for spending some time with me here & I hope you like what you see.
Until next time!
Yours,
Steph

Supplies used:
Paper Smooches - Happy Place
Distress Inks (wild hones, tumbled glass, peacock feathers)
White & colored card stock
Natural twine
White & see through sequins

I participate in the following challenges with this card:
Virginia's Challenge #12: Shaker Cards
February's Theme: Shaker Cards
RIC #77: Jenny Packham
 
Cas-ual Fridays #136: Watercolor (Distress Inks)

SSS Wednesday Challenge: bright & beautiful
Simon Says Stamp Wednesday Challenge Blog

Saturday, January 31, 2015

wedding cards don't need to be traditional!

Welcome paper crafters!

Today I'm sharing a rather unconventional wedding card with you. My friends are dear dog lovers and these 2 puppies are just too cute & fit perfectly for this customized love themed card in my view.

The background is covered with translucent embossing paste to 'lock in' the color & the front panel is embedded on hand made paper (Japanese paper).

Apologies for the pixeling on the photo but I didn't want to share personal details publicly... hope you understand.
Supplies used:
- SSS stencil
- Art Impressions - cat & dog front & back
- Japanese hand made paper
- Lawn Fawn - alphabet stamp set

Thanks a lot for stopping by, I really appreciate all your lovely comments & feedback - it's so amazing to hear that you like my creations!

Until next time!
Yours,
Steph

I participate in the following challenges with this card:
SSS Wednesday Challenge
Simon Says Stamp Wednesday Challenge Blog
Muse Challenge #102

Art Impressions Challenge #152


Most Popular Posts @CraftedBySteph