Showing posts with label Distress Inks. Show all posts

Monday, May 2, 2016

Interactive Card: the 'wiggle' effect ON YOUTUBE (Altenew Challenge #6)


Hello dear crafters!
Today's entry clearly is a SPECIAL EDITION:
I have created my VERY FIRST Youtube video!!


And yes, I was struggling massively…! haha :-) 

So let me explain where this all is coming from and what actually made me do this:


Many of you may know that Altenew started having Video Challenges since a few months now and while I always admired those crafters actually doing a video of their creations in their spare time, I always thought this is something not for me (lack of time, technical skills, etc.). But some 2 weeks ago I saw the weather forecast predicting an Arctic cold over Europe and so my gardening plans all died out. After all my business travelling I planned on having a calm weekend, and so I thought: why not make a new card and film myself while doing so!? And let's not worry about the editing… I might never do it and that's absolutely fine! 

Well, what can I say, I'm competitive, and especially when it's against myself, and so I couldn't have this SUPER-LONG & really boring video on my phone, I HAD TO DO SOMETHING WITH IT!Those of you who have tried to create a video , may know what came next…. A big struggle of OMG HOW do I edit a video? HOW can I cut it down? Fast forward? Apps/Softwares? Voice over? – No! pheewww this is all really overwhelming!

Well, it's a hobby, right? So it should be fun and exciting! So I started slowly, bit by bit… And frankly, that's exactly what it was – fun and exciting to learn something new! I enjoyed looking for a free editing app, learning how to use it, playing with all sorts of settings (on my phone as well as my crafting table), etc. No time pressure! 

I know the outcome is not great, but for a first try, I am actually quite proud of myself :-)

Yes, next time I will try to  craft on a sunny day, have more training with the editing, might try annoying you with my accent, and so on and so forth… but give me some time, I actually enjoy the (slow) process! 

So enough about the video struggles, let's talk about my creation:

Altenew is known for their amazing & classy looking style, but I was certain that one can do more than elegant cards with their amazing stamps; so I was going for a modern & interactive look!

This is what came out: A ROCKING SYDNEY OPERA card!! Yes, you can wiggle the Opera House with your fingers, and the "mechanism" is all hand-made (no fancy gadgets involved other than a simple gum ring you will find in your kitchen)!!
Check out the video if you would like to see how I do it (yes, a video comes in very handy when making out-of-the-ordinary-cards, to explain in pictures what I have actually been doing to create the 'wiggle' effect). 

Hope you enjoy this raw little diamond of mine & hope to see you soon!

Ah, and a BIG GIGANTIC THANK YOU TO ALTENEW FOR GETTING ME OUT OF MY COMFORT ZONE & MAKING ME DISCOVER THIS NEW WORLD OF TECHNOLOGY – AWESOME! I would have never done it without your challenge blog but I am so glad I did! 

Until next time! With a video?? Who knows :-) 

Yours,
Steph
 
PS: I'm also participating with this card in the latest Simon Says Stamp Monday Challenge 'show your metal' (what's better than a ton of Liquid Platinum 😉), as well as the Simon Says Stamp Wednesday Challenge 'anything goes'.
And this card also fits perfectly to Altenew's latest Inspirational Challenge which is about: AUSTRALIA!
Simon Says Stamp Monday Challenge BlogSimon Says Stamp Wednesday Challenge BlogAltenew_Inspiration Challenge_May


Monday, August 3, 2015

RELAX!

Hello dear crafters!

It really seems as if I had disappeared lately! The last few weeks were so soaked up with business & leisure travel, but now I'm back & very keen on getting my fingers inky again!!


To start my mojo again, I just had to create a relaxing summer themed card – look what came out:
And here is a close-up of that cute little kitty snoozing in the hammock:

This little kitty is a single wood mounted stamp which I have in my stash since quite a while & I absolutely adore it! Not sure who's the designer though, but it's so super cute I find.

If you look carefully at Lawnfawn's "Life Is Good" hammock, then you'll see that it is actually a little smaller than here on my card. TRICK: Just stamp half of the hammock to one side, stamp the other half with a little distance apart (as big as you want the hammock to be, although I think stretching it for an inch or more won't look very good anymore), take a fine black marker & connect the dots. Voila, here you have a larger hammock for larger critters ;-)

Watercolor is still very much in fashion, and I love it as much as most of you, so I've created a very simple background by simply drawing 3 soft colored lines to mimic the sky, the ocean & the beach.

Lot's and lot's of foam squares make this card really POP!

supplies used:
- Lawnfawn "Life Is Good"

- Paper Smooches "Get Outta Town"

- Distress Inks: Wind Honey, Peacock Feathers, Tumbled Glass, Spiced Marmelade (hammock)

- Watercolor Pencils (Caran D'Ache) for the kitty, & the palm trees


Thanks for stopping by & I hope to see you again soon!

Yours,
Steph


P.S.: I am participating in the following challenges with this card:


>> SSS Monday Challenge *Make a Plan* (the plan is definitely self-addressed to take more time off & to RELAX - just like this kitty!)

>> Stempelküche Challenge *Sommerzeit*

>> Paper Smooches *Anything Goes*

>> I just stumbled over a (new to me) adorable challenge blog where I thought my card would fit perfectly4 Crafty Chicks with their current *Anything Goes* Challenge


Grab our Badge!Simon Says Stamp Wednesday Challenge BlogSimon Says Stamp Monday Challenge Blog

Wednesday, May 13, 2015

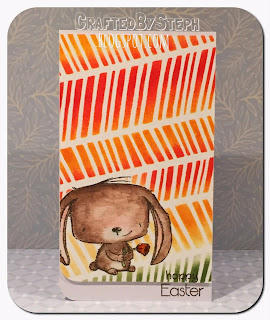
I love stencils!

Welcome back,

Today I would like to share another favorite technique of mine:  
working with stencils!

I loved stencils ever since I was a child, because they give you the precise outlines without being a particularly gifted painter - yet it always looks perfectly hand-drawn or hand made.
What an awesome product!! = )

What I particularly like when using stencils for backgrounds is the fact that you can really go wild and essentially create your own patterned paper - only custom made!

This is exactly what I've been doing for this card here: The intention was to create a very powerful background, yet combined with a little bit of green to "ground" my little fury friend without any extra fuzz. 
I'm a great fan of Simon Says' stencils and that's why I would like to dedicate this card to the latest "Simon Exclusives Challenge". 

Material's used:
- SSS stencil
- Stacey Yacula stamps (Purple Onion Designs)
- Ranger Distress Inks (barn door, wild honey, shabby shutters) 
- Watercolor pencils (for the bunny, check out how I drew the fur, I'm so proud of the result)
- Wink of stellar (inside of the ears)
- Glossy accents (on the flower)

Happy crafting & see you again soon!
Yours, Steph

Simon Says Stamp Monday Challenge Blog

Wednesday, April 8, 2015

Doppelter Geburtstag (buchstäblich) - double birthday (literally)!

Hallo liebe Papier-Freunde,

Ich hatte letztens eine neue Herausforderung: Eine Karte für neugeborene Zwillinge!
Und da Zwillinge bekanntlich im Doppelpack kommen, hab ich gedacht ich probiere das Spiegel-Stempeln aus (damit sich die 2 Häschen anschauen können). Nicht ganz einfach muss ich sagen... aber nach etwa 5 Probedurchläufen ists es mir endgültig *schön* gelungen :o)

Hier die Karte auf die ich besonders wegen dem 3D-Hintergrund (durchsichtige Embossing-Paste gemischt mit Distress Inks) stolz bin: 


verwendete Materialien:
- SSS Schablone
- Durchsichtige Embossing-Paste
- Distress inks (wild honey, spiced marmelade)
- Stempel von Stacey Yacula (Purple Onion)
- Klebeperlen
- "Baker's twine" grau
- Wassermalstifte

Mit dieser Karte mache ich bei den folgenden Challenges mit:
- SSS Wednesday Challenge - Birthday (buchstäblich Geburtstag)
- SSS Monday Challenge - *A* is for... (*adorable bunnies*)
- Virginia's View Challenge - Layers & Dimensions (viel 3-D hier mit der Paste & den Häschen auf dicken "foam pads")
- Friday Mashup Challenge - 203 (Häschen & Farb-Kombi)
- Always Playing with Paper - Challenge #29 (Sketch)

Bis bald,
Eure Steph

* * * * *

Hello dear paper-friends,

Lately I faced a new challenge: Making a card for newborn Twins! And because twins always come in a pack of 2, I thought I'll try to do some 'mirror-stamping' (to make these cute bunnies face each other). Not quite so easy I must admit... but I managed to get a *proper* result after 5 attempts :o)

I'm particularly proud of this card because of the 3-D background (translucent embossing paste mixed with distress inks).

Supplies used:
- SSS Stencil
- Translucent Embossing-Paste
- Distress inks (wild honey, spiced marmelade)
- Stamp from Stacey Yacula (Purple Onion)
- Sticky pearls
- "Baker's twine" grey
- Watercolor pencils

With this card I participate in the following challenges:
- SSS Wednesday Challenge - Birthday (literally birthday)
- SSS Monday Challenge - *A* is for... (*adorable bunnies*) 
- Virginia's View Challenge - Layers & Dimensions (lot's of 3-D here with the embossing paste & the bunnies on thick foam pads)
- Friday Mashup Challenge - 203 (bunnies & color combo)
- Always Playing with Paper - Challenge #29 (Sketch)  

Until next time,
Yours Steph
Simon Says Stamp Monday Challenge BlogSimon Says Stamp Wednesday Challenge BlogApril/May Challenge: Layers and Dimensions


Wednesday, February 25, 2015

Hoppy Birthday

Welcome back!

Those wintery Lawn Fawn bunnies are so adorable and I can't wait to use them for all my Easter cards too, but before I get started for Easter, there are many birthday cards to be made. See the versatile cute little bunny in my new creation:

Supplies used:
- Lawn Fawn: Snow Day
- Patterned paper
- Craft cardstock
- SSS Stencil
- Wink of stellar & white gel pen
- Glossy Accents
- Translucent Embossing Paste 
- Distress Inks

It's a bit hard to see but the patterned paper has a nice texture to it and I've added some translucent Embossing Paste to give it some more 3D feel. And I love the subtle texture the white pigment ink gives on craft card stock (you need to let this dry over night!). 

Until next time!

Steph


I participate in the following challenges with this card:
Lawn Fawn's 100th Challenge: Birthdays

SSS Monday Challenge: No Rules
Simon Says Stamp Monday Challenge Blog
SSS Wednesday Challenge: Add a little Texture
Simon Says Stamp Wednesday Challenge Blog


Wednesday, February 11, 2015

Love penguins!!

Hello again,

I would like to share my new love with you: adorable 'Walter' from Stacey Yacula's (Purple Onion) latest collection! I have only recently discovered Stacey's incredible talent on Therese's blog (LostInPaper) and I immediately fell in love with these cute stamps.
I am now the proud owner of a few of these lovely critters & absolutely addicted to making cards with them!!

Here my first attempt for a love-themed card:

A bit of masking technique, some heat embossing & distress markers... that's it!

See you soon & thanks for your visit!
Take care,
Steph

Supplies used:
- Walter the pinguin from Stacey Yacula (Purple Onion)
- Distress Inks (tumbled glass, peacock feathers, pumice stone, faded jeans)
- White & Seafoam embossing powder
- Watercolor pencils
- Black & white card stock

I participate in the following challenges with this card:
Cas-ual Friday Challenge: Love Watercolor


SSS Wednesday Challenge: bright & beautiful
Simon Says Stamp Wednesday Challenge Blog


Stempelküche Challenge #12: von Herzen


Inspiration Journal: Love is in the air

RIC Challenge #77 - Jenny Packham


Tuesday, February 10, 2015

Longing for summer...

Hi there & thanks for stopping by again!

I must admit the short winter days in Europe & the low temperatures are slowly getting to me, so I decided to bring the summer into my crafting room:

This was a special project not only to lift my own mood, but also as a birthday gift for my friend who loves to travel the world (particularly the sunny & relaxing places).

What's special about this card is the see-through shaker element on the front panel, where all adhesive is nicely hidden behind hand-cut frames & palm trees (as you may know I still don't have a die cutting machine so I make everything by hand, and I actually like the outcome a lot).
Adhering the thread for the hammocks was a little fiddly I admit, but the end result shows that it's worth the effort!

And by the way: the white sequins in the shaker part should imitate some white wash of the waves... in case you were wondering =D

I for my part want to go to my favorite Australian beach now... oh if it wasn't so far away!

Thanks for spending some time with me here & I hope you like what you see.
Until next time!
Yours,
Steph

Supplies used:
Paper Smooches - Happy Place
Distress Inks (wild hones, tumbled glass, peacock feathers)
White & colored card stock
Natural twine
White & see through sequins

I participate in the following challenges with this card:
Virginia's Challenge #12: Shaker Cards
February's Theme: Shaker Cards
RIC #77: Jenny Packham
 
Cas-ual Fridays #136: Watercolor (Distress Inks)

SSS Wednesday Challenge: bright & beautiful
Simon Says Stamp Wednesday Challenge Blog

Most Popular Posts @CraftedBySteph