Wednesday, May 27, 2015

textured modelling paste & digi files

Hello everyone,

Today I would like to spotlight 2 new techniques:

1.) Textured Modelling Paste:
I found this new product in my local craft store & immediately fell in love with it! It has quite a rough & grainy texture & probably won't work with very intricate stencils, but the result is striking & I can't wait for winter cards where I can use this paste to create 3D snowflakes! For those who are wondering if I bought this paste in different colors: no! I bought it only in white because you can color it in any way you like with distress ink, acrylic paint, other ink pads, you name it...

2.) Digi Stamps:
Now let me get this straight first: I AM NOT OLD! I partially grew up with computers and consider myself quite tech savvy! But having said that: I HAVE NO CLUE HOW TO USE THOSE DIGI STAMPS.... Admittedly I have never used a digi stamp before, but because I really wanted to participate in the *Create A Smile Guest Designer Call* (and I don't have any create a smile stamps yet), I thought I give them a try. There are probably many easier ways, but this is how I've used the digi file:
 
  • I copied the image to a Word doc & shrank its size approximately to what I thought would fit on the panel of my card
  • I printed it on normal paper
  • I traced over the lines with a soft pencil & "copied" that then on different colored card stock (black white).
  • I've paper pieced everything and the sail is actually still the normal card stock, but I've covered it with orange Washi tape
  • All in all, it took me almost forever to trace everything properly, cutting it out & assembling it all together again properly... but I still had a lot of fun doing it and I am very happy with the result = )
  • Bottom line: While I'm happy I've tried digi stamps, to me there is nothing that beats the pleasure of stamping, so I guess I'll stick to stamps in the future.
@ Create a Smile: I love your stamps, stencils, papers, washi etc A LOT & I hope you see all my extra efforts here to be able to participate in your guest designer call = )

See you guys again soon!
Yours,

Steph


P.S.: With this card I also participate in the Simon Says Stamp Wednesday Challenge (*Stencil It*) & the Neat & Tangled Challenge #56 (*clean and simple")
Simon Says Stamp Wednesday Challenge Blog

Wednesday, May 20, 2015

A FLORAL card crafted by Steph?

Hello!

Today I need to confess a few things:
 
  • I realized I've never made a floral card
  • I never knew what to do with those tiny little stamps in some stamp sets, particularly the flowers
  • I always thought flower cards are boring to make

When I saw the Stempelküche Challenge though, I thought I'll give it a try and I am BEYOND excited to state the following:

  • I've finally created my first floral card and I LOVE IT!
  • I finally found out how to use all those little embellishment stamps
  • Flower cards are DEFINITELY NOT boring to create!!!

This is the result of my creativity (again with this cute bunny from Stacey Yacula Designs - Purple Onion):


I've used mostly Lawn Fawn & Avery Elle stamp sets (those with tiny flowers as embellishment stamps) and it's all stamped in different colors & colored in/shadows with watercolor pencils on watercolor card stock. A little Wink of Stellar on the flowers & the bunny ears as well as a bit of Glossy Accents here and there finished off the card.

I know you're missing the sentiment here, let me explain: 

This is a "thank you" card, but because my friends speak several languages, I left the sentiment out for the moment and will decide later on whether it's going to be a simple "Danke", "Merci", "Gracias" or "Thank you" in the end (it will be small & most probably hand written at the inside of my card to not distract from the rest).

I hope you got inspired & will dig out your little embellishment stamps more often in the future - there are amazing things you can do with these = )

Yours, 

Steph

P.S.: With this card I'm also participating in Lawn Fawns "try a new technique" challenge (never stamped a wreath), the Simon Says Stamp "X, Y, Z,...." challenge (the X, Y, Z instantly reminded me of the many stamp sets & mini stamps I've used here to create this wreath), as well as the Avery Elle "Spring" Challenge (couldn't be more fitting I guess).
Challenge 24
Simon Says Stamp Monday Challenge Blog

Wednesday, May 13, 2015

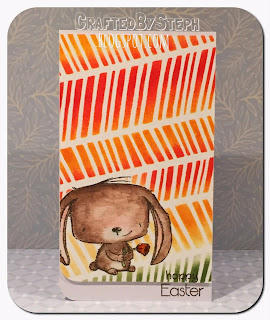
I love stencils!

Welcome back,

Today I would like to share another favorite technique of mine:  
working with stencils!

I loved stencils ever since I was a child, because they give you the precise outlines without being a particularly gifted painter - yet it always looks perfectly hand-drawn or hand made.
What an awesome product!! = )

What I particularly like when using stencils for backgrounds is the fact that you can really go wild and essentially create your own patterned paper - only custom made!

This is exactly what I've been doing for this card here: The intention was to create a very powerful background, yet combined with a little bit of green to "ground" my little fury friend without any extra fuzz. 
I'm a great fan of Simon Says' stencils and that's why I would like to dedicate this card to the latest "Simon Exclusives Challenge". 

Material's used:
- SSS stencil
- Stacey Yacula stamps (Purple Onion Designs)
- Ranger Distress Inks (barn door, wild honey, shabby shutters) 
- Watercolor pencils (for the bunny, check out how I drew the fur, I'm so proud of the result)
- Wink of stellar (inside of the ears)
- Glossy accents (on the flower)

Happy crafting & see you again soon!
Yours, Steph

Simon Says Stamp Monday Challenge Blog

Most Popular Posts @CraftedBySteph